文章原文来自:Code your own blockchain in less than 200 lines of Go!,原始文章是通过 Go 语言来实现自己的区块链的,这里我们参照该文章来使用 C# + Asp.Net Core 实现自己的区块链。在这里我也参考了 这篇译文 。
1.项目配置
首先新建一个 Asp.Net Core 项目,然后选择 Empty Project(空项目) 类型,建立完成后无需进行任何配置。
2.数据模型
这里我们来创建一个具体的区块数据模型,使用的是 Struct 结构体。
 1
 2
 3
 4
 5
 6
 7
 8
 9
10
11
12
13
14
15
16
17
18
19
20
21
22
23
|
public struct Block
{
    /// <summary>
    /// 区块位置
    /// </summary>
    public int Index { get; set; }
    /// <summary>
    /// 区块生成时间戳
    /// </summary>
    public string TimeStamp { get; set; }
    /// <summary>
    /// 心率数值
    /// </summary>
    public int BPM { get; set; }
    /// <summary>
    /// 区块 SHA-256 散列值
    /// </summary>
    public string Hash { get; set; }
    /// <summary>
    /// 前一个区块 SHA-256 散列值
    /// </summary>
    public string PrevHash { get; set; }
}
|
这里各个字段的含义已经在注释上方标明了,这里不在过多赘述。
之后我们新建一个 BlockGenerator 静态类用于管理区块链,并且使用一个 List 保存区块链数据。
1
2
3
4
|
public static class BlockGenerator
{
    public static List<Block> _blockChain = new List<Block>();
}
|
我们使用散列算法(SHA256)来确定和维护链中块和块正确的顺序,确保每一个块的 PrevHash 值等于前一个块中的 Hash 值,这样就以正确的块顺序构建出链:

4.散列与生成区块
使用散列是因为可以使用极少的控件生成每一个区块的唯一标识,而且可以维持整个区块链的完整性,通过每个区块存储的前一个链的散列值,我们就可以确保区块链当中每一个区块的正确性,任何针对区块的无效更改都会导致散列值的改变,也就破坏了区块链。
那么我们就在 BlockGenerator 当中添加一个函数用于计算 Block 的 Hash 值:
 1
 2
 3
 4
 5
 6
 7
 8
 9
10
11
12
13
14
15
16
17
|
/// <summary>
/// 计算区块 HASH 值
/// </summary>
/// <param name="block">区块实例</param>
/// <returns>计算完成的区块散列值</returns>
public static string CalculateHash(Block block)
{
    string calculationStr = $"{block.Index}{block.TimeStamp}{block.BPM}{block.PrevHash}";
    SHA256 sha256Generator = SHA256.Create();
    byte[] sha256HashBytes = sha256Generator.ComputeHash(Encoding.UTF8.GetBytes(calculationStr));
    StringBuilder sha256StrBuilder = new StringBuilder();
    foreach (byte @byte in sha256HashBytes)
    {
        sha256StrBuilder.Append(@byte.ToString("x2"));
    }
    return sha256StrBuilder.ToString();
}
|
这里的 CalculateHash 函数接收一个 Block 实例,通过该实例当中的 Index、TimeStamp、BPM、PrevHash 的值来计算出当前块的 SHA256 Hash 值,之后我们就可以来编写一个生成块的函数:
 1
 2
 3
 4
 5
 6
 7
 8
 9
10
11
12
13
14
15
16
17
18
|
/// <summary>
/// 生成新的区块
/// </summary>
/// <param name="oldBlock">旧的区块数据</param>
/// <param name="BPM">心率</param>
/// <returns>新的区块</returns>
public static Block GenerateBlock(Block oldBlock, int BPM)
{
    Block newBlock = new Block()
    {
        Index = oldBlock.Index + 1,
        TimeStamp = CalculateCurrentTimeUTC(),
        BPM = BPM,
        PrevHash = oldBlock.Hash
    };
    newBlock.Hash = CalculateHash(newBlock);
    return newBlock;
}
|
这个函数需要接收前一个块对象的值,用于新区块的 Index 递增以及 新的 SHA256 Hash 计算。
这里掺入了一个 CalculateCurrentTimeUTC 函数,该函数主要是用于将 DateTime.Now 时间转换为 UTC 时间,如下:
 1
 2
 3
 4
 5
 6
 7
 8
 9
10
11
|
/// <summary>
/// 计算当前时间的 UTC 表示格式
/// </summary>
/// <returns>UTC 时间字符串</returns>
public static string CalculateCurrentTimeUTC()
{
    DateTime startTime = new DateTime(1970, 1, 1, 0, 0, 0, 0);
    DateTime nowTime = DateTime.Now;
    long unixTime = (long)Math.Round((nowTime - startTime).TotalMilliseconds, MidpointRounding.AwayFromZero);
    return unixTime.ToString();
}
|
5.校验区块
每一个区块都是不可信的,所以我们需要在生成新的区块的时候对其进行校验,校验规则如下:
- 校验新区块与旧区块的 Index 是否正确递增
- 校验新区块的 Hash 值是否正确
- 校验新区块的 PrevHash 值是否与旧区块的 Hash 值匹配
有了上述几种条件,我们可以编写一个校验函数如下:
 1
 2
 3
 4
 5
 6
 7
 8
 9
10
11
12
13
|
/// <summary>
/// 检验区块是否有效
/// </summary>
/// <param name="newBlock">新生成的区块数据</param>
/// <param name="oldBlock">旧的区块数据</param>
/// <returns>有效返回 TRUE,无效返回 FALSE</returns>
public static bool IsBlockValid(Block newBlock, Block oldBlock)
{
    if (oldBlock.Index + 1 != newBlock.Index) return false;
    if (oldBlock.Hash != newBlock.PrevHash) return false;
    if (CalculateHash(newBlock) != newBlock.Hash) return false;
    return true;
}
|
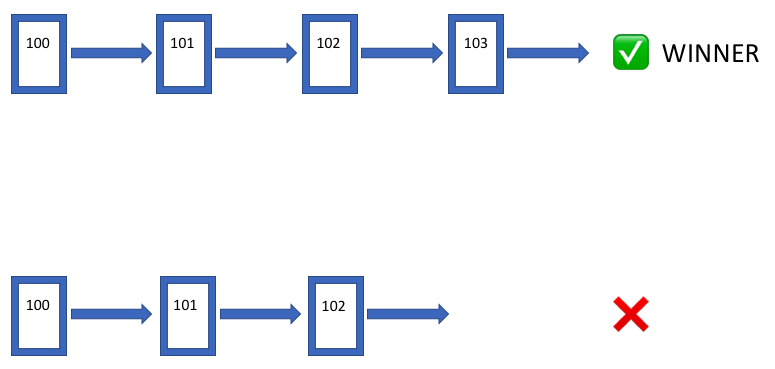
除开区块校验的问题之外,如果有两个节点被分别添加到各自的区块链上,我们应该始终以最长的那一条为主线,因为最长的那一条意味着他的区块数据始终是最新的。
 So,我们还需要一个更新最新区块的函数:
 1
 2
 3
 4
 5
 6
 7
 8
 9
10
11
|
/// <summary>
/// 如果新的区块链比当前区块链更新,则切换当前区块链为最新区块链
/// </summary>
/// <param name="newBlockChain">新的区块链</param>
public static void SwitchChain(List<Block> newBlockChain)
{
    if (newBlockChain.Count > _blockChain.Count)
    {
        _blockChain = newBlockChain;
    }
}
|
6.集成到 Web 当中
现在整个区块链的基本操作已经完成,现在我们需要让他运转起来,我们来到 StartUp 当中,添加两个新的路由:
 1
 2
 3
 4
 5
 6
 7
 8
 9
10
11
12
13
14
15
16
17
18
19
20
21
22
23
24
25
26
27
28
29
30
31
32
33
34
35
36
37
38
39
40
41
42
43
44
45
46
47
|
app.Map("/BlockChain", _ =>
{
    _.Run(async context =>
    {
        if (context.Request.Method == "POST")
        {
            // 增加区块链
            if (BlockGenerator._blockChain.Count == 0)
            {
                Block firstBlock = new Block()
                {
                    Index = 0,
                    TimeStamp = BlockGenerator.CalculateCurrentTimeUTC(),
                    BPM = 0,
                    Hash = string.Empty,
                    PrevHash = string.Empty
                };
                BlockGenerator._blockChain.Add(firstBlock);
                await context.Response.WriteAsync(JsonConvert.SerializeObject(firstBlock));
            }
            else
            {
                int.TryParse(context.Request.Form["BPM"][0], out int bpm);
                Block oldBlock = BlockGenerator._blockChain.Last();
                Block newBlock = BlockGenerator.GenerateBlock(oldBlock, bpm);
                if (BlockGenerator.IsBlockValid(newBlock, oldBlock))
                {
                    List<Block> newBlockChain = new List<Block>();
                    foreach (var block in BlockGenerator._blockChain)
                    {
                        newBlockChain.Add(block);
                    }
                    newBlockChain.Add(newBlock);
                    BlockGenerator.SwitchChain(newBlockChain);
                }
                await context.Response.WriteAsync(JsonConvert.SerializeObject(newBlock));
            }
        }
    });
});
app.Map("/BlockChains", _ =>
{
    _.Run(async context =>
    {
        await context.Response.WriteAsync(JsonConvert.SerializeObject(BlockGenerator._blockChain));
    });
});
|
7.最终效果
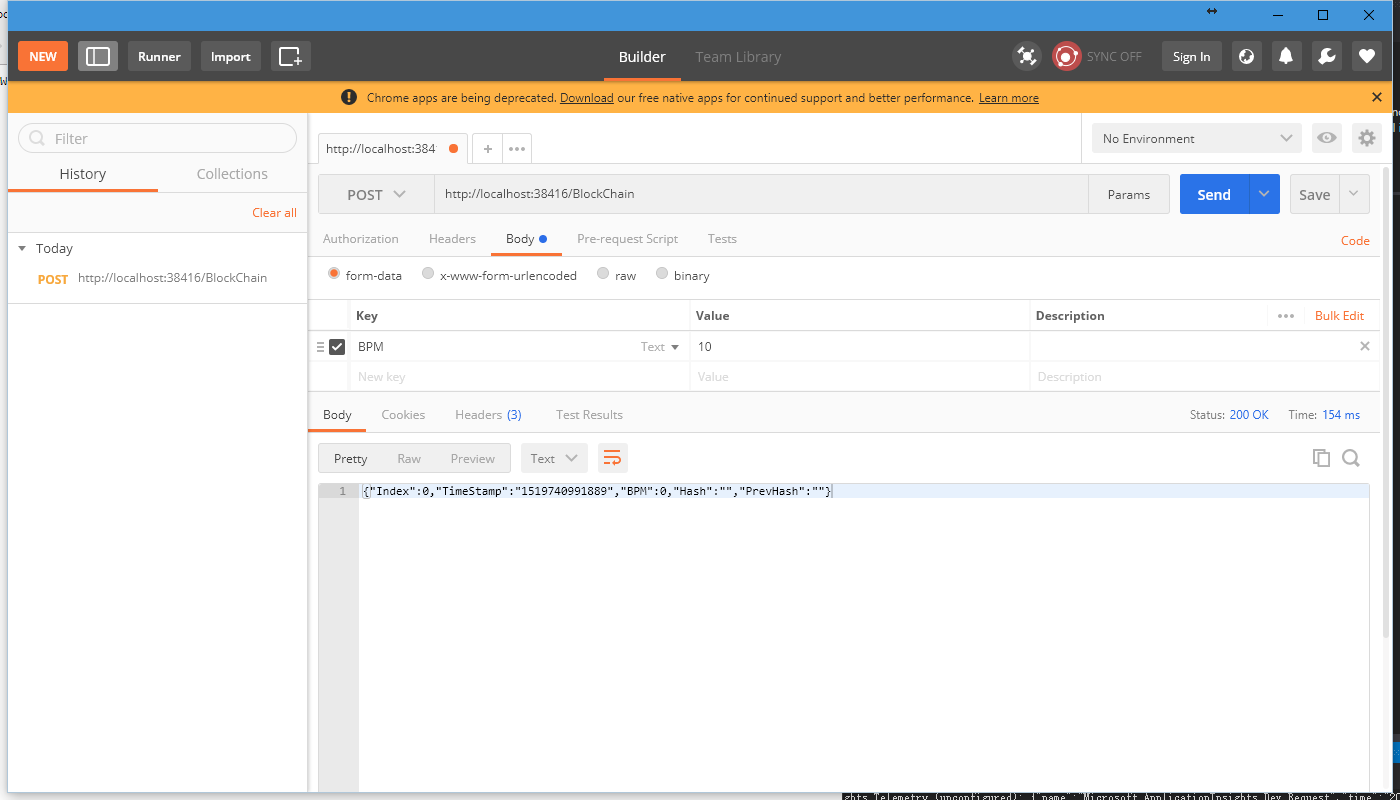
我们先通过 PostMan 来构建一个创世块:
 然后我们尝试多添加几个之后,访问 BlockChain 来查看已经存在的区块链结构:

8.结语
通过以上代码我们完成了一个简陋的区块链,虽然十分简陋,但是已经具备了块生成,散列计算,块校验这些基本能力,你可以参考 GitHub 上面各种成熟的区块链实现来完成工作量证明、权益证明这样的共识算法,或者是智能合约、Dapp、侧链等等。

 So,我们还需要一个更新最新区块的函数:
 然后我们尝试多添加几个之后,访问 BlockChain 来查看已经存在的区块链结构:
